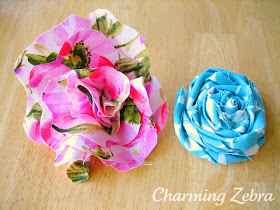
To make a fabric rosette, cut a long strip of fabric about 2 inches wide and as long as the fabric. Mine tended to be between 20-24 inches. You can just cut with scissors by hand (like I did) if you don't have a rotary cutter since it doesn't have to be perfectly straight.
Next, you're going to fold one of the fabric strips lengthwise so the "pretty" side is showing on either side. It's okay if it flops back open because you will be folding as you wrap it.
Begin rolling the fabric around about two or three times in a relatively tight coil. Then continue wrapping the fabric around the coil but twisting the fabric upside down every little bit as you roll around so sometimes the fold is on the top and sometimes the cut ends will be at the top. I liked the look when I rolled it loosely but you have to adjust and play with it a little that way. You might have more control if you roll it more tightly but then you will create a different look and use more fabric.
I used a hot glue gun to secure the end of the fabric when I was finished rolling. I added another strip of fabric to the rosette in the picture but you can make them as small or large as you want by adding more fabric. (On my Cutesy Spring Wreath I used between one and three strips for each rosette.) This is a loose flower that would be great if hot glued to a project. (I have additional instructions later on in the post if you wanted to make the rosette into a pin or hair clip.)
The next tutorial is for this large floppy flower. (No glue gun required, only thread and a needle.)
Start off by cutting out a wavy edged flower about 1 1/2 inches wide. Place it on top of the fabric and cut out another flower about 1/2 inch bigger on each side. (Don't worry about matching up the curves since it looks better if the pattern is a little more random.)
So basically, it is going to look like this. (I added another layer after the photo was taken.)
When you are finished cutting out the flower shapes, take the smallest and bunch it together in your hand from the center with the pretty side facing you. (I have two layers bunched together in the photo.)
Turn it around and sew a little bit on the end to keep it together. (Now, this need not be a professional job, you only need a few stitches.) Keep adding the next bigger size up and sew through all the previous layers. You might need to sew a little higher up around with each larger addition so the flower stays ruffled. You may add as many or as few layers as you want to create the perfect sized flower for your project.
When you're finished, you have a beautiful (and easily made) floppy flower. I think a bunch of them would look great on a wreath or a single flower attached to a gift box.
I made my flower much bigger than the rosette.
Here is another way to make fabric flowers and rosettes. These two were made by a friend of mine and have a little bling added.
My friend rolled her rosette much tighter and glued it to a felt circle to stabilize it. She then glued a clip to the circle. Now it's perfect for wearing in your hair, clipping on a shirt or purse.
Fabric flowers are wonderful. No water or wilting and they always look beautiful. Perfect for a project or a great way to use up fabric scraps.
Have you created a new fabric flower design? I would love to see it.


Great tutorial! It's time to get out the fabric scraps. I can't wait to make these cute rosettes!
ReplyDeleteThese are cute-I haven't ever made any but I am going to try. Have you tried any of the ones made from zippers I saw them somewhere and they seemed cute and quite original too.
ReplyDeleteLove them! Thanks for the tutorial! I really, really want to do this!
ReplyDeletehttp://www.remodelandolacasa.com
So lovely, Miss Charming. Thanks for sharing. Much love, Lisa
ReplyDeleteThat's such a great tutorial. They're so easy to make ...
ReplyDeleteYou should hook them up to our "It's a Cinch" linky party going on over at my blog today! It's a perfect fit! Plus if you link up on my blog you'll automatically be linked to five parties ...
:)
Linda
Thanks for the tutorial - it's so easy to follow! I'm planning a room re-do for my Mom and I'm hoping to use a few of these on some pillows! Thanks for sharing :)
ReplyDelete